Individuals who use graphic-intensive applications like games and heavy-duty professional tools need to control how their graphics card is being used regularly. Some gamers regularly need to toggle their graphics quality settings to increase their FPS (Frames per Second). Some users, especially those with heavy-duty professional tools, need to adjust their displays’ orientation, size, and scaling to use their computers more efficiently.
Contents
Nvidia Control Panel Functions
The Nvidia Control Panel is a software program used to manage several settings related to your Nvidia graphics card. The software can be used to alter display settings such as screen resolution and so on.
Excellent Viewing Experience
Amongst the top-most features of Nvidia are the image settings. They have a straightforward manner of adjusting the quality of visual effects. It enables you to fine-tune your game’s imagery and resolution. It also hosts several control features such as texture quality, resolution, and anti-aliasing.
Play it your way
Every choice in the settings list has a significant impact on quality and speed. Therefore, it is paramount that you start on features that affect your game or application the most.
Ambient Occlusion
It is a critical tool that enables you to see your game or application in a new light. It has a way of enhancing the shadow and lighting details.
Anisotropic Filtering
When it comes to improving image quality, the importance of texture filtering is often overlooked. However, it is a crucial aspect that significantly enhances your game or application’s image quality to appear crisp and lifelike.
Anti-aliasing (FXAA)
It is a common phenomenon that retro games have irregularly notched details and low physical motion. The Nvidia Control Panel is an excellent tool for smoothening out images.
Fixing the Nvidia Control Panel Problems.
Many Nvidia graphics users have had issues with launching the control panel. This problem spans across Microsoft’s Operating Systems from Windows 7 to Windows 10. Failure to open the Nvidia Control Panel can be a problem, especially for users who like customizing their graphics card settings.
However, the good news is some practical solutions can be implemented to overcome this issue. These are discussed below.
1. Check your Antivirus Software
One of the most common causes of application problems can be your antivirus software. Sometimes you can’t access your Nvidia Control Panel because your antivirus-software will be interfering with it. To address this issue, you should check your antivirus-software settings and ensure that they aren’t blocking the Nvidia Control Panel.
If the antivirus settings are not the problem, you should try to disable certain antivirus features and check if it helps. If the worst comes to the worst, you can even try uninstalling the antivirus. Several users have opined that the AVG antivirus software is the one that caused their Nvidia Control Panel not opening, and upon uninstalling it, the issue was resolved. Even if you are not an AVG user, you can try removing your antivirus and check if it solves the problem.
If uninstalling the antivirus solves the problem, then you should consider switching to an alternative antivirus solution. There are several excellent antivirus tools available on the market today. If you intend to have glitch-free protection that will not interfere with your system, then you should consider using tools such as Bitdefender.
2. End the Nvidia Display Contain Process
Sometimes inevitable glitches can occur on your system, causing issues with some processes. Therefore, if you cannot open the Nvidia Control Panel, the problem can be solved by ending the Nvidia Control Process. It is a simple procedure that can be executed by following the following easy steps:
- Access the Task Manager by hitting Ctrl + Shift + Esc.
- Identify the Nvidia Display Container process, right-click it, and select End Task from the menu.
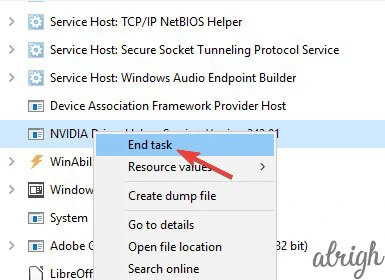
After executing that, the process will restart itself, and you will be able to access Nvidia Control Panel. It is crucial to highlight that this is just a workaround. Therefore it is probable that you will have to redo it again after you restart your computer.
3. Ensure that all the necessary Services are running
For your system to function well, certain services need to be running. The same applies to Nvidia Control Panel. If you are having problems with opening Nvidia Control Panel, then possibly, the prerequisite services are not running.
It is crucial to highlight that Nvidia Control Panel is dependent upon two services. To ensure that these services are running, one needs to follow the procedure described below.
- Press the Windows Key + R and enter the command services.msc. Then press Enter or click OK.
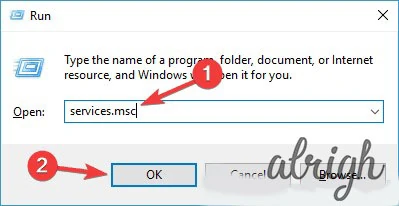
- When the services window has popped up, you should identify Nvidia Display Container LS and click it twice to open its properties.
- You should now set the Startup type to Automatic click the Start button to launch the service. Then click Apply and OK so that the changes are saved.
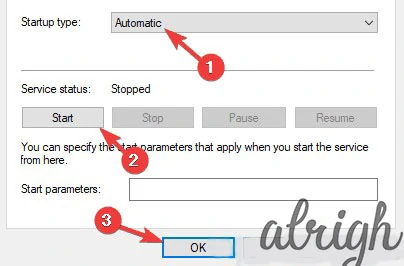
- You should now identify the locate Nvidia Network Service Container, set its Startup type to Automatic, and ensure that the service is functioning.
After executing this procedure, the Nvidia Control Panel not opening should have been completely eradicated.
4. Launch the application directly from the Installation Directory.
If you are unable to open Nvidia Control Panel on your Personal Computer, you might be able to solve this issue by starting the application directly from the installation memory. It is a simple procedure to execute. You have to follow the steps described below.
- Navigate your way to the C: Program Files NVIDIA Corporation Control Panel Client directory.
- Locate and run nvcplui.exe.

After so doing, the Nvidia Control Panel should be able to launch without any problems. If you are willing, you can even create a shortcut of the desktop application to quickly access those tools that you can access easily.
Users can also force start Nvidia Control Panel automatically within their systems. They will need to create a shortcut of the Nvidia Control Panel and put it in the C: Program Data Microsoft Windows Start Menu Programs Start Up directory. Such a move will ensure that the application starts automatically with their system always.
By so doing, the Nvidia Control Panel will start automatically with your system every time.
5. Disable Fast Boot option
Windows 10 is equipped with a useful feature called Fast Boot. It enables it to boot faster than the previous versions of Windows. It is a tool that won’t turn off your computer. Therefore, if you cannot open Nvidia Control Panel on Windows 10, you can probably address the issue by disabling Fast Boot. It is a simple procedure that you can execute as follows:
- Hit Windows Key + S and enter power settings. From the menu, select Power & sleep settings.
- In the right pane, scroll to the Related settings section and opt for Additional power settings.
- The Power Options window will now pop up. From the menu on the left side, select the Choose what the power button does.
- Hit on Change settings that are currently unavailable.
- Uncheck Turn on fast startup (recommended) option and click Save changes to ensure so.
After following that procedure, the Fast Boot option should be disabled entirely. It is vital to highlight that your system will start relatively slower than previously, but Nvidia Control Panel’s issue would have been resolved.
6. Update your Drivers and System
If you cannot open Nvidia Control Panel on your PC, then the issue might be with your drivers. The Nvidia drivers might be outdated, causing this and numerous other errors to appear. To address this problem, you should update your Nvidia.
To do so, you have to visit Nvidia’s website and download the latest drivers for your graphics card. After so doing, install them, and that should resolve the issue. Users who do not prefer to manually search for drivers should use third-party tools such as TweakBit Driver Updater. This tool updates your graphics card and all the other outdated drivers on your system automatically. Therefore, it is recommended that you utilize it. It is also advantageous because it will guard your system against permanent damage caused by manually downloading and installing the wrong driver versions.
Also, the failure of Nvidia to open can be solved by updating your entire system as well. It is an easy task to execute, and the procedure is described below.
- Open the Settings app. You can do that quite fast by utilizing Windows Key + I shortcut.
- When the Settings app shows up, navigate to the Update & Security section.
- In the right pane, click the Check for updates button.
After doing the process mentioned earlier, if there are any system updates available, they will be downloaded immediately in the background. They will be installed as soon as you restart your PC. Once your system and drivers are updated, the problem could have been resolved entirely.
7. Reinstall the driver from NVIDIA GeForce Experience
The problems with Nvidia Control Panel can be solved by reinstalling the driver. A significant number of computer users report that they could fix the problem with their Nvidia Control Panel not opening by reinstalling the driver from the Nvidia GeForce Experience application.
To do so, one must follow these few steps:
- Open NVIDIA GeForce Experience.
- Now head over to the Drivers section.
- Choose Reinstall the driver option and select Quick install.
- Follow the instructions that appear on the screen to finish the reinstall process.
When the driver is reinstalled, verify if the problem still persists.
8. Ensure that Nvidia Control Panel is not hidden.
You may fail to open Nvidia Control Panel because it is hidden. Specific Windows or software updates would have hidden it. However, the good news is there is a way to fix this problem. To do so, one has to follow the easy steps that are described below.
- Hit Windows Key + S and enter the control panel. Select Control Panel from the list of results that come up.
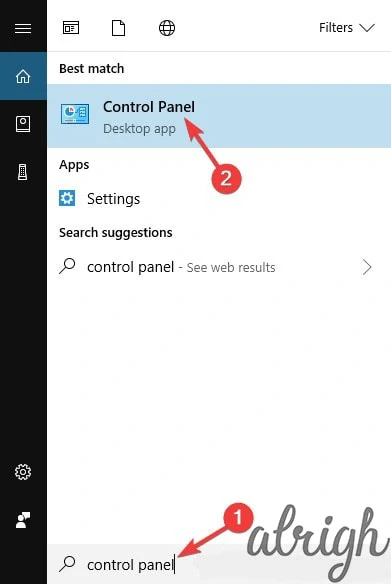
- When Control Panel shows, select Nvidia Control Panel.

- Nvidia Control Panel should now open. Navigate to Desktop and choose Add Desktop Context Menu and Show Notification Tray Icon.
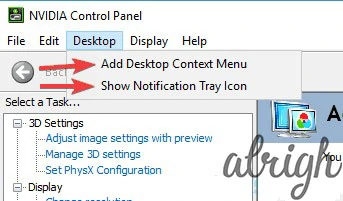
After so doing, you will find the Nvidia Control Panel in your Taskbar and your context menu.
Similar issues can be solved by the solutions provided
It is also crucial to highlight that several other problems can be solved with one of the solutions already provided above.
- Nvidia Control Panel has stopped working on Windows 10 – Probably the issue with your antivirus software.
- Nvidia Control Panel is not working on Windows 7 64 bit – This problem can appear on older versions of Windows. Still, you should solve that issue with one of the solutions that have already been suggested above.
- Nvidia Control Panel cannot be found – If you cannot locate Nvidia Control Panel, navigate to its installation directory, create a shortcut on your desktop, and the issue should be fixed.
- Nvidia Control Panel missing – Numerous users have reported that Nvidia Control Panel is missing on their computers, but that will not the case. You will have to open the Control Panel and be able to access it.
- Nvidia Control Panel not showing – It happens when the software was not installed with the drivers or has stopped running.
- Nvidia Control Panel won’t start – Several users complained of failing to open Nvidia Control Panel from the Windows Control Panel, which is likely a result of the wrong driver.
Conclusion
Being unable to open Nvidia Control Panel can be a significant setback, particularly for individuals who prefer fine-tuning their graphics card. The good news is that the suggested remedial solutions mentioned above are ones that you can do yourself. There is no need to fork out any amount of money to have the issue addressed. It is hoped that one of the solutions suggested above can help solve the problem.
