Has your computer become ridiculously slow? Are your games taking too much time to load? Well, this might be occurring due to the Service Host: SysMain high disk usage issue. SysMain takes up a lot of your resources which may result in this problem. However, you can always fix it yourself by disabling the Service host safely. We shall show you how to do so and other ways to improve your slow PC effectively in this article. So, let’s dive right in, shall we?
What is Service Host: Superfetch or SysMain, and Should you Disable it?
Windows launched Service host Superfetch/SysMain to speed up the app processes. However, there are a few drawbacks that occur, like high CPU usage and high disk usage. Windows Vista introduced Superfetch whereas, Windows 10 came up with SysMain. However, they are both the same services.
SysMain learns the user’s system usage pattern and tweaks the system for its optimal performance. Deactivating it won’t cause you any harm. Disabling it might help your PC function better as it might resolve the high disk/CPU usage issue.
How to Fix Super Host: Superfetch or SysMain using 100% Disk/CPU Usage?
Fix 1: How to disable Service Host: SysMain on Windows 10?
Disable SysMain/Superfetch via Services management console (Windows Services)
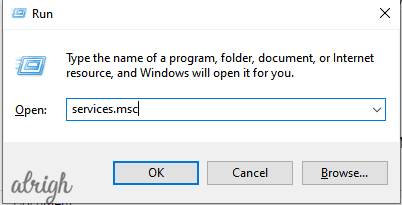
1. In the Windows 10 Search box, type Run. Alternatively, You could also press Windows+R to open the same tab.
2. In the Open box, type services.msc and click on the OK button.
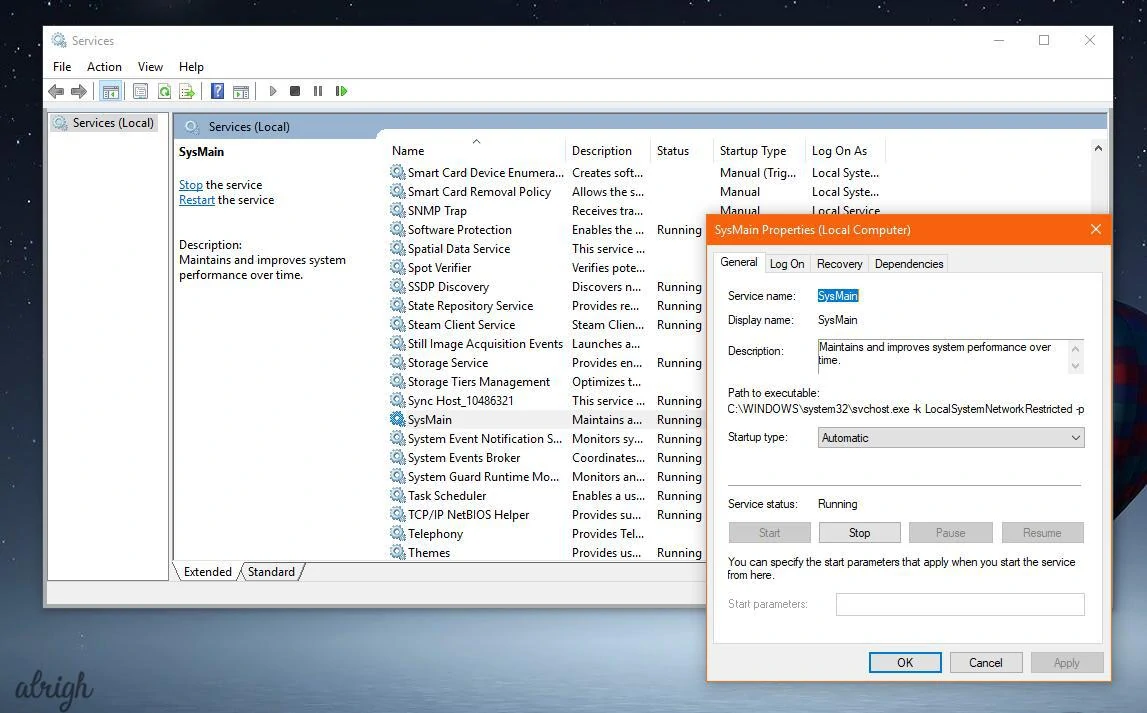
3. After that, locate Superfetch/SysMain and right-click on it.
Select “Properties”> Select “Stop” in the new window, which has popped up> Click on “Disabled” from the ‘startup type’ drop-down menu.
Disable SysMain using the command prompt
1. Open Command Prompt from the Start Menu. Right-click on it and select “Run as administrator.” Then, select “Yes” to continue.

2. Use the commands:
- Enable: sc config “SysMain” start=auto & sc start “SysMain”
- Disable: sc stop “SysMain” & sc config “SysMain” start=disabled
Wait for a few minutes, and then check your PC’s disk usage in the Task Manager. Go to the Processes tab, and check for the % at the top of the Disk column. If it’s no longer 100%, the problem has been fixed!
Disable SysMain via the Windows Registry
1. In the Windows 10 Search box, type Run. Alternatively, You could also press Windows+R to open the same tab.
2. In the Open box, type Regedit and click on the OK button.
3. On the Registry Editor window, locate HKEY_LOCAL_MACHINE/SYSTEM/CurrentControlSet/Control/Session Manager/MemoryManagement/PrefetchParameters.
4. Click open the “Enabled Superfetch” option. In the Value Data box, change its value to 0 and click on the “OK” button.
For SysMain, you will find the “Enabled SysMain” option. Follow the same steps after that.
5. Restart your PC to see if the service host Superfetch/SysMain 100% disk usage in Windows 10 is fixed or not.
Fix 2: How to disable the Service Host Local System tasks Directly?
Disabling the Service Host Local System tasks is also a way to fix the problem. It is a method to refresh the system for better functional efficiency. The following steps will guide you through the process.
1. Open your Start Menu and select Task Manager. Right-click on the Task Manager from the context menu to continue.
2. Open the Processes tab.
3. Scroll down to locate the Service Host: Local System. Open/Expand it to find out which items are hogging your CPU, disk, and memory unnecessarily.
4. Right-click on these items and choose “End task” to disable them.
5. On clicking “End task,” you will receive a warning message asking whether you want to end the Service Host: Local System. Check the option Abandon unsaved data and close it.
To check whether your issue ‘Service host local system high disk usage’ has been resolved or not, monitor your CPU in the Task Manager.
Fix 3: How to Disable the Backup Intelligent Transfer Service?
1. In the Windows 10 Search box, type Run. Alternatively, You could also press Windows+R to open the same tab.
2. Type MSConfig in the box and press Enter.
3. Go to the Services tab. Scroll down to locate Background Intelligent Transfer Service and uncheck the option. Click Apply and OK to save the changes.
When you are done with these steps, you can restart your PC to check whether the issue: Service host high disk usage has been solved or not.
Fix 4: How to Run the System File Checker?
The issue Service host SysMain high disk usage may also be caused by corrupted system files. To resolve the issue, you can run System File Checker to check the corrupted files.
1. From the Start menu, open the Command Prompt window.
2. Type the command: sfc/scannow and press Enter to continue. Don’t close the window until the scanning process has been completed.
3. When the scanning process is completed, the System File Checker will locate the corrupted system files and repair them.
Fix 5: How to Upgrade your CPU?
Last but not least, UPGRADE YOUR CPU. The Central Processing Unit is called the Brain of the computer. So, it’s not going to be a total shocker if the Service host issue occurs due to an old CPU.
Note that upgrading a CPU has its risks. Your PC may fail to boot due to some incompatibility problem after upgrading your CPU. This means you would need to reinstall Windows. Thus, remember to backup your data before going ahead with this process.
So there your go! The fixes mentioned above are the most user-friendly and effective fixes for the Service host SysMain high disk usage issue. Tell us which method worked for you in the comments down below!