When it comes to Minecraft, you can never get enough of it. After all, there are not many open-ended sandbox games where you can explore infinite worlds with online communities and build anything to your heart’s content. However, despite its simplistic gameplay, Minecraft is a heavy application, especially if you’ve added various plugins and texture packs to beautify its graphics.
You see, the bigger and more detailed your Minecraft world gets, the more Memory (RAM) needs to be allocated to it. This article will tell you when it is time for you to allocate more RAM to Minecraft and how to do so with easy and efficient steps.
Contents
What are the signs that you need to allocate more RAM?
Well, one of the most common signs that will tell you it’s time to allocate more RAM to your Minecraft is when your client keeps crashing continuously.
It will either crash when you try to connect to the Minecraft server, or it may not start at all! This error is more pronounced in a heavily modded Minecraft game.
If you want to experience more intensive gameplay and enhanced graphic settings, you will have to add a few mods/plugins. This automatically means that more RAM will have to be allocated to Minecraft. Otherwise, your frames will stutter, the game will load slowly, etc.
For the modded version of Minecraft, you require at least 4 Gigabytes of Memory or even 6 GB, whereas the vanilla gameplay version only requires a minimum of 2GB.
How to allocate more RAM to Minecraft?
There are several ways to allocate more RAM to Minecraft using different launchers. Every launcher provides a different gameplay experience thus, making it unique in its way. The following methods are based on the most popular launchers.
Method 1: Via the default Launcher aka Microsoft Launcher
1. Open your Microsoft Launcher and choose the version you prefer playing. That is, either the Java version or the bedrock version.
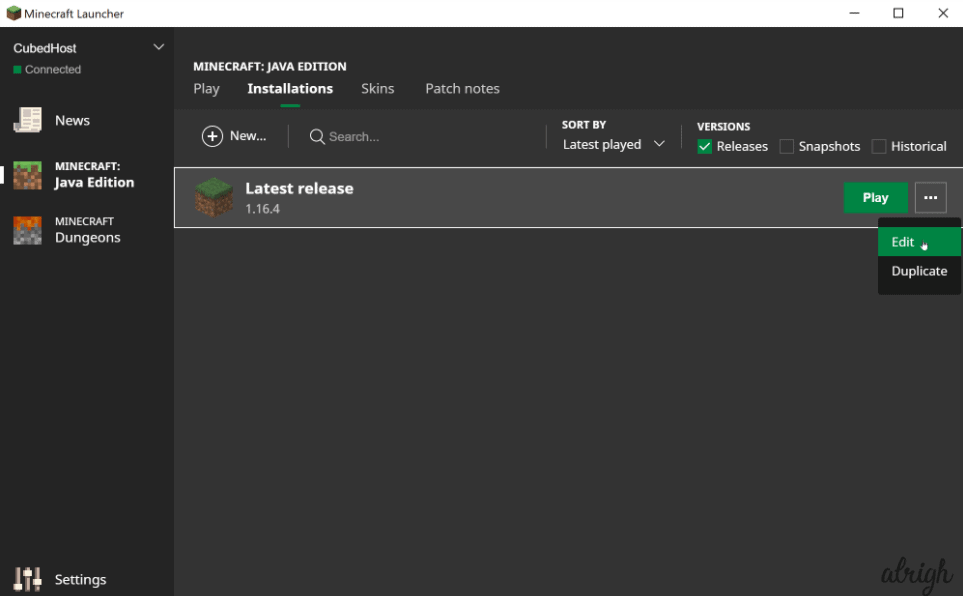
2. Click on the Installations tab present on the top of the launcher.
3. Check out the different Minecraft versions available in the released list. Choose your preferred version, and click on the button with the three white dots. Then click on the Edit option.
4. A modal will appear with the name of the installation, the version, and a few other options. Click on the More Options button available on the bottom-right of the list.
5. Now, scroll down until you see the JVM arguments field, and change -Xmx1G to -Xmx*G, where * stands for the amount of RAM you would like to allocate your Minecraft in GB.
Note: Do not change any other option/text.
6. Click on the Save button and tada! You’re all done.
You can choose to allocate all your RAM to Minecraft. But whether the game will utilize it fully or not depends on whether any other programs or apps are running in the background.
Method 2: Via the ATLauncher
If you’re wary of any sort of coding, then this is the method for you. It is even more simple than the previous method! Here’s what you have to do:
1. Open the ATLauncher.
2. You will find a list of options on the right side menu pane of the launcher. Click on the Settings menu tab and then click on the Java/Minecraft button present at the top of the screen.
3. From the new drop-down menu, you can choose to allocate the desired amount of Memory to your Minecraft. To do this, go to the Maximum Memory/RAM option in the menu and type in the preferred amount of Memory. You can also make use of the up-and-down signs to increase or decrease the Memory by 0.5 GB successively.
4. Finally, click on the Save button to experience the changes made immediately.
Method 3: Via the Twitch Launcher aka Curse launcher/ FTB Modpacks
This method is as easy and almost as similar to the ATLauncher version method!
1. First of all, launch your Twitch Client.
2. Go to the top-right corner and click on the three lines. From there, go to Files and then Settings.
3. Now, in the new pop-up screen, locate Minecraft and scroll down to find the Java Settings section.
4. Locate Allocated Memory and use the slider to allocate more or less RAM to Minecraft. The slider increases or decreases RAM by 0.25 GB successively.
5. And that’s it. All you have to do now is go back to Mods, open Minecraft, and you’ll be able to see the increase in performance instantly.
Note: Recommended amount of RAM to be allocated – at least 4096 MB.
Method 4: Via the Technic Launcher
1. Open Technic launcher.
2. In the top right corner, you will find a little icon labeled as Launcher Settings. Click on it.
3. Click on the Java Settings tab in the navigation bar, present in the Java Settings Window.
4. A new menu will drop down, which will offer you the option to adjust the Memory according to your preferences. The changes you’ve made will be saved automatically.
5. Close your Launcher Settings and get back to your game to experience a more reliable performance.
How to free up RAM on your PC?
Here are a few tips and tricks which will help you with memory allocation in the most efficient way possible. They will help you make the most of your RAM allocation without having to delete apps and programs unnecessarily.
1. Restart your PC.
This helps you get a clean slate in the sense that your programs will be rebooted, all the processes running in the background will be cleared out, and your RAM will be wiped clean.
2. Getting your software updated.
3. Clear out your cookies and cache.
4. Disable browser extensions.
5. Stop running apps like Spotify, Discord, etc., in the background.
If you are unable to allocate more than 1 GB to your Minecraft, it means your computer has a 32bit version of Java installed in its system. To resolve this, all you need to do is uninstall Java and then install the 64bit version on your system. Finally, restart your PC.
While allocating more RAM to Minecraft will inevitably enhance your Minecraft experience, the problems will reduce, but too much of something is also not good.
If you allocate too much RAM to your Minecraft while ignoring the other system requirements, your overall system performance will go down. So, it’s always a good idea to allocate at least 1 GB for different processes not related to gaming.